Archive
Simple Erlang – Java communication example
If there is a need to communicate with Erlang processes or to build Erlang/Java distributed system, JInterface can be used. I have written simple ping-pong application to communicate between Erlang and Java process.
Erlang module:
-module(hello_world).
-export([start/0,pong/0]).

pong() ->
	receive
		stop ->
			io:format("Pong finished...~n",[]);
		{PingId,ping} ->
			io:format("Ping~n",[]),
			PingId ! {self(),pong},
			pong()
	end.

start() ->
		register(pong,spawn(hello_world,pong,[])).
In the start() function a process ‘pong’ is registered. Pong() functions when received {PingId,ping} tuple just print the ‘Ping’ message and send {self(),pong} tuples to process which initially ping this process. Here PingId is the process id of the process which send {PingId,ping} tuple to ‘pong’ process. Also, pong process terminate when it receive ‘stop’ message.
Now, lets write Java node which ping our Erlang pong process.
Java program
import java.io.IOException;
import com.ericsson.otp.erlang.OtpErlangAtom;
import com.ericsson.otp.erlang.OtpErlangDecodeException;
import com.ericsson.otp.erlang.OtpErlangExit;
import com.ericsson.otp.erlang.OtpErlangObject;
import com.ericsson.otp.erlang.OtpErlangPid;
import com.ericsson.otp.erlang.OtpErlangTuple;
import com.ericsson.otp.erlang.OtpMbox;
import com.ericsson.otp.erlang.OtpNode;

public class JinterfaceHelloWorld {
	static String server = "server";

	public static void main(String[] _args) throws Exception {

		OtpNode self = null;
		OtpMbox mbox = null;
		try {
			self = new OtpNode("mynode", "test");
			mbox = self.createMbox("facserver");

			if (self.ping(server, 2000)) {
				System.out.println("remote is up");
			} else {
				System.out.println("remote is not up");
				return;
			}
		} catch (IOException e1) {
			e1.printStackTrace();
		}

		OtpErlangObject[] msg = new OtpErlangObject[2];
		msg[0] = mbox.self();
		msg[1] = new OtpErlangAtom("ping");
		OtpErlangTuple tuple = new OtpErlangTuple(msg);
		mbox.send("pong", server, tuple);

		while (true)
			try {
				OtpErlangObject robj = mbox.receive();
				OtpErlangTuple rtuple = (OtpErlangTuple) robj;
				OtpErlangPid fromPid = (OtpErlangPid) (rtuple.elementAt(0));
				OtpErlangObject rmsg = rtuple.elementAt(1);

				System.out.println("Message: " + rmsg + " received from:  "
						+ fromPid.toString());

				OtpErlangAtom ok = new OtpErlangAtom("stop");
				mbox.send(fromPid, ok);
				break;

			} catch (OtpErlangExit e) {
				e.printStackTrace();
				break;
			} catch (OtpErlangDecodeException e) {
				e.printStackTrace();
			}
	}
}
Creating Java node and process
In line 19, new Java node is created as follows:
self = new OtpNode(“mynode”, “test”);
Here first argument ‘mynode’ is the name of the node and ‘test’ is a cookie of this node.
Next, we have to create process that runs in this node using mailbox:
mbox = self.createMbox(“pingserver”);
The process is created with name ‘pingserver’
Sending message to Erlang process
In line 35 we create Erlang tuple containing two fields – porcess id of process itself and ‘ping’ atom. Finally, send(processName,nodeName,message) method of mailbox is used to send message to Erlang process.
mbox.send(“pong”, server, tuple);
Receiving message from Erlang process
mailbox provides receive() method to receive message from other process. In line 40, OtpErlangObject robj is received:
OtpErlangObject o = mbox.receive();
In line 42-43, process id of sender and message is extracted from received erlang tuple.
At the end, in line 48-49 stop message is send to Erlang process to stop the process.
Running Erlang node
In command prompt start erlang node as follows:
erl -sname server -setcookie test
In this command, ‘server’ is the name of erlang node and ‘test’ is the cookie. Note the use of this values in Java program.
Now, go to the folder where you have saved your Erlang module and compile the erlang code.
c(hello_world)
Start the erlang process:
hello_world:start().
Running Java node
This should be the simplest task :), compile the JinterfaceHelloWorld.java and run it.
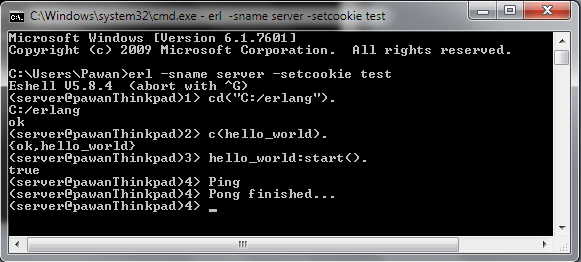
Observe the erlang console and it should look like this:
How to set higher screen resolution in Ubuntu guest OS on Virtualbox?
I have Windows 7 as host OS and I installed Ubuntu 10.04 as a guest on Virtual box. Initially the screen resolution in guest screen was restricted to 800 X 600, although I have options of as high as 1280 X 800 in my host (Windows 7).
To change the display of guest Ubuntu OS on Virtualbox to a better screen resolution I installed Guest additions in Ubuntu and steps are explained below:
1. Install Guest Additions: Start guest Ubuntu on Virtualbox and select Devices > Install Guest Additions.
Now the ISO for Guest Additions will be mounted automatically and you should see the CD icon on your desktop (VBOXADDITIONS_3.2.10_66523).If it is not visible just restart Ubuntu.
2. Open the terminal. Applications->Accessories->Terminal. Now go to location where Guest Additions are stored. In my case it is in /media. Now run the appropriate installer. For example: for 32 bit computer and Ubuntu OS commands are shown below:
 Provide the administrative password and install will begin.
3. After the installation completes restart the guest Ubuntu OS.
4. Now you can see the available resolution by going into System->Preferences->Monitors.
Go to Machine->Enter Fullscreen Mode and enjoy the higher display resolution.


